

In the previous two parts, we have created T0 VRF for an organization “OrganizationA”. We have also verified the VMware Cloud director configuration with vSphere and NSX-T Manager. We deployed two separate Tenants in different provider VDCs. However, in
this session, we will discuss routing between two different provider VDCs belonging to the same organization. This can be achieved either by configuring Data center groups or by configuring separate Tier-1 routers per provider VDCs and connecting them to tier-0 VRF router
Routing between provider VDCs via separate Tier-1 routers
we will create two vAPP’s one in Tenant-A and another in Tenant-B. A segment-A will be made in vAPP of provider VDC-1, which will be created to Tenant-A Tier-1, and another segment segment-B will be made in vAPP of provider VDC-2 and connected to Tenant-B Tier-1. Network connectivity between two provide VDCs, which are in different Data centers is elaborated below.

Creating a Tier-1 gateway in Provider VDC-1 (Tenant-A)
In this section, we will create a new Tier-1 gateway and dedicate it to Tenant-A, which is in provider VDC-1.
| Name | Tier-1-Tenant-A |
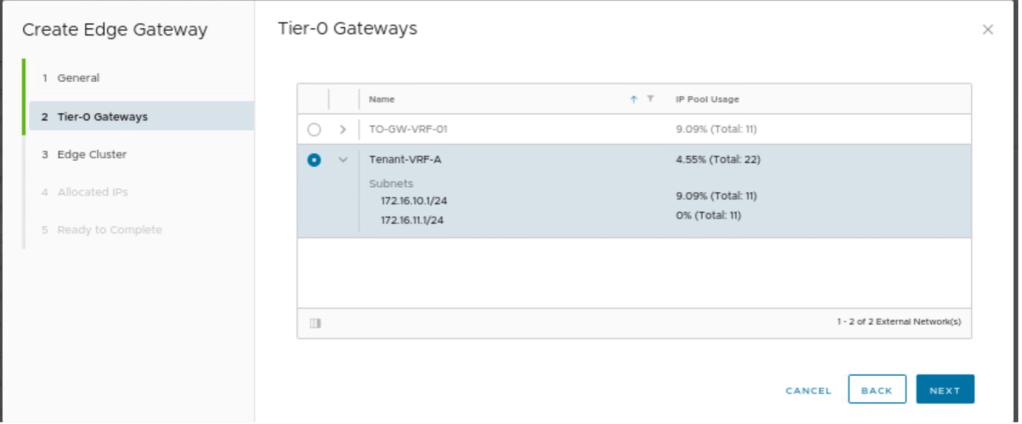
| Tier-0 Gateway | Tenant_VRF_A |
| Edge Cluster | Create new or use existing Edge Cluster |
| Allocated IP subnet | Inherit it from the Tier-0 gateway |
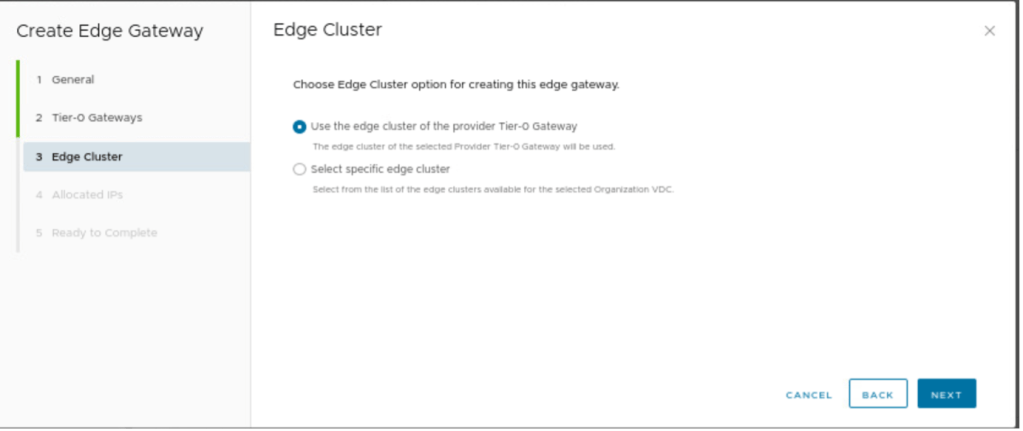
NB: A new Tier-1 gateway can be created using a new edge cluster or the same edge cluster, which was used to configure the parent and child Tier-0 gateway. Make sure to configure fault domains.

A new Tier-1 gateway is configured with the name “Tier-1-Tenant-A”.

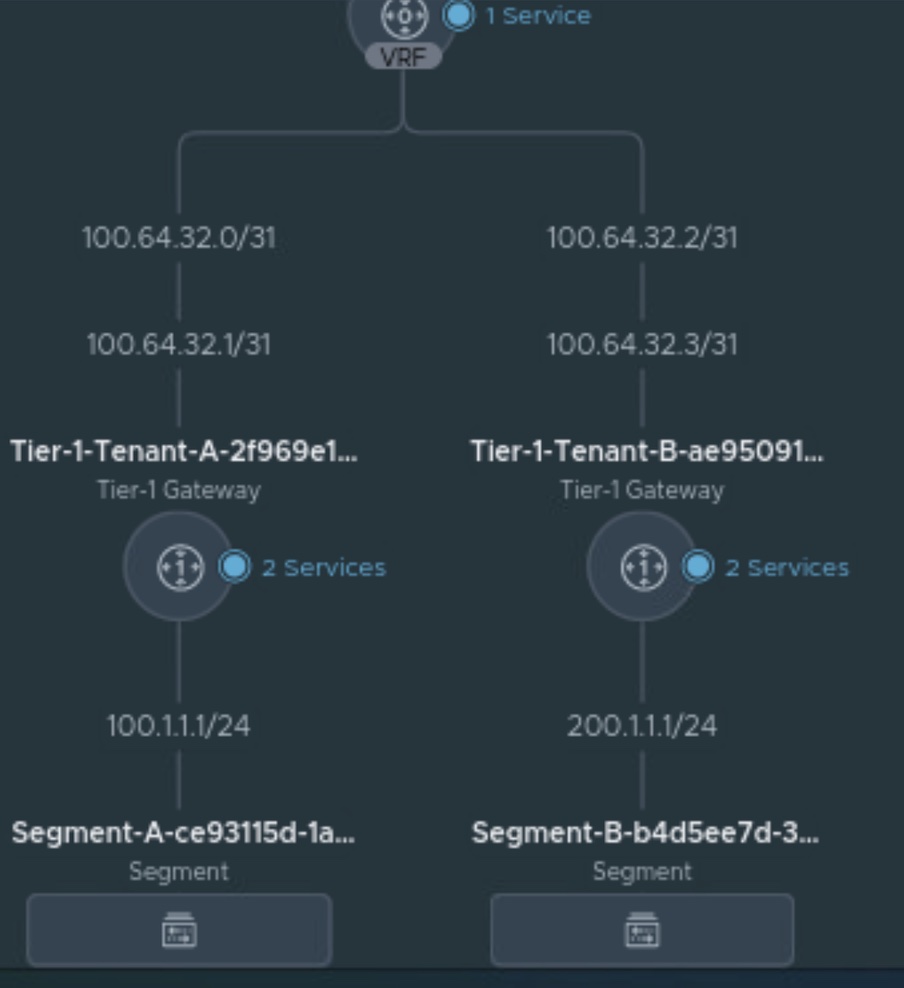
Tier-0 gateway is already deployed. and the new Tier-1 gateway will be connected to the Tier-0 gateway specified in this section. Tier-1 and Tier0 gateways will be connected via inter-transit link 100.64.0.0/12.

Specify the edge cluster which can be a new edge cluster for each tenant or it can be the same used to deploy the parent/ child Tier-0 gateways.

Provide the IP subnet for the edge cluster for any stateful services like NAT. We used the same IP subnet when we onboarded child Tier-0 in Part-2. Make sure to advertise the subnet via set route advertisement rules in Tier-1 in case, this IP subnet is used for any stateful services.

Review the configuration and click on finish.

Verifying the creation of Tier-1 for Tenant-A in VCD.
Creating a Network Segment in Provider VDC-1 (Tenant-A)
In this session, a new routed segment will be created and it will be attached to the Tier-1 gateway configured in the previous step.
In this blog, we are not considering the Datacenter group, which we will discuss in the next part.
| Scope | Current organization Virtual Data Center |
| Network Type | Routed |
| Edge Connection | Tier-1-Tenant-A |
| Gateway CIDR | 100.1.1.1/24 |
| IP Pool | 100.1.1.1-100.1.1.14 |
| DNS | NA |
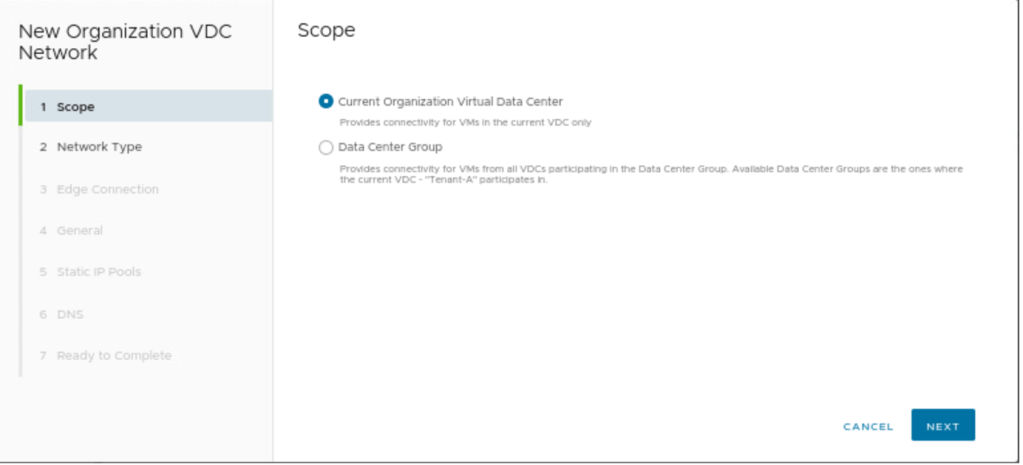
Select Current Organization Virtual Data Center, as separate Segments will be created for both Tenants belonging to the same organization.

The routed segment will be selected, and this segment will be created for the Tier-1 gateway.
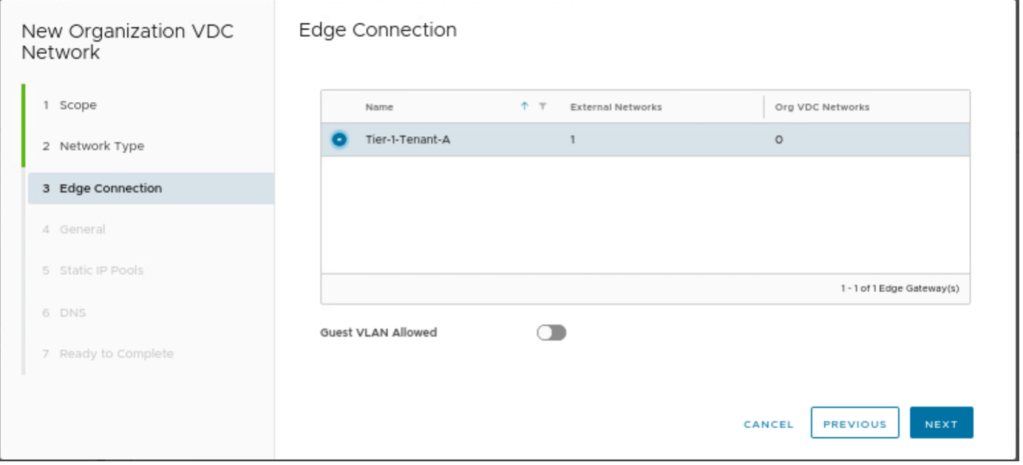
Select, the edge connection (Tier-1) gateway, on which the new routed segment will be connected.

A gateway CIDR has to be configured, for the newly created routed segment, along with that a new IP pool will be configured, which can be used to provide IP addresses to VM in a vAPP.


In our scenario, we don’t have any DNS details, therefore, no information has been provided.

Review the configuration and create a new routed segment.

In the network session of OrgVDC Tenant-A, verify that a new routed segment along with Gateway CIDR and connected gateway is visible.
Creating a new VM in Tenant-A vAPP and connecting to Segment-A
In this part of the blog, a new VM-1 in the new vAPP will be created with the following details and will be connected to Segment-A.
| vAPP Name | Tenant-A-vAPP |
| VM Name | VM-1 |
| Type | From Template |
| Templates | CentOS7 |
| Storage | Default |
| NIC | 100.1.1.10/24 |

A new VM “VM-1” will be created with CentOS and get an IP address from IP Pool.

Review the configuration and create a VM.
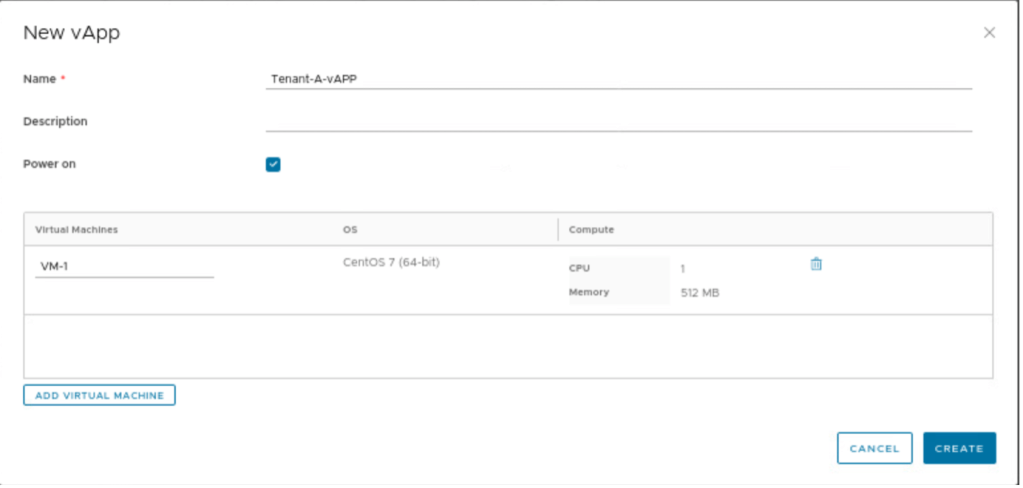
Give the name to a vAPP “Tenant-A-vAPP” and click on create.
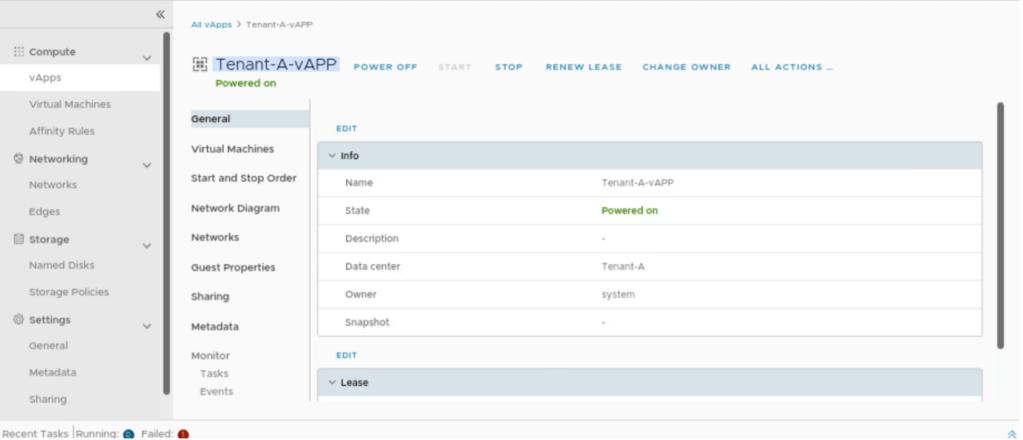
Verify the name that a new VM-1 in Tenant-A-vAPP has been created and connected to segment Segment-A.
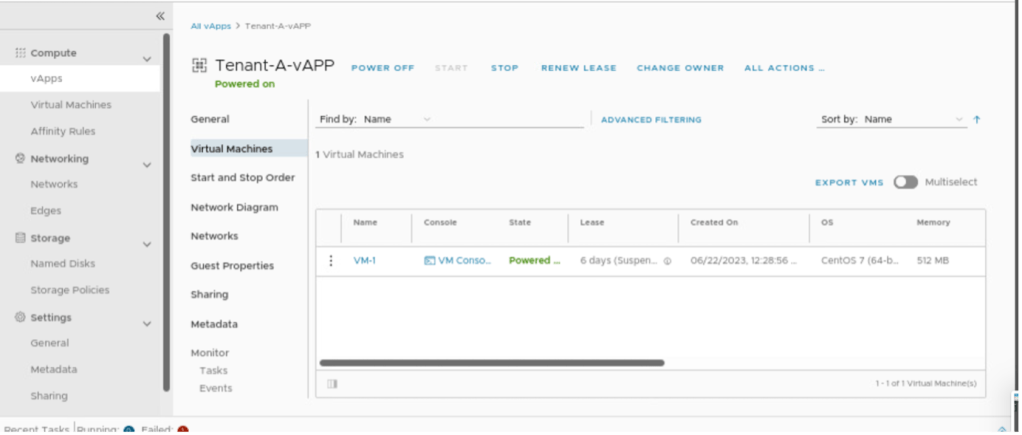
Go to Virtual Machines of vAPP “Tenant-A-vAPP” and power on the VM ”VM-1”.

Check on the Network diagram session of vAPP “Tenant-A-vAPP” and it will verify that the newly created VM-1 is connected to Segment-A.
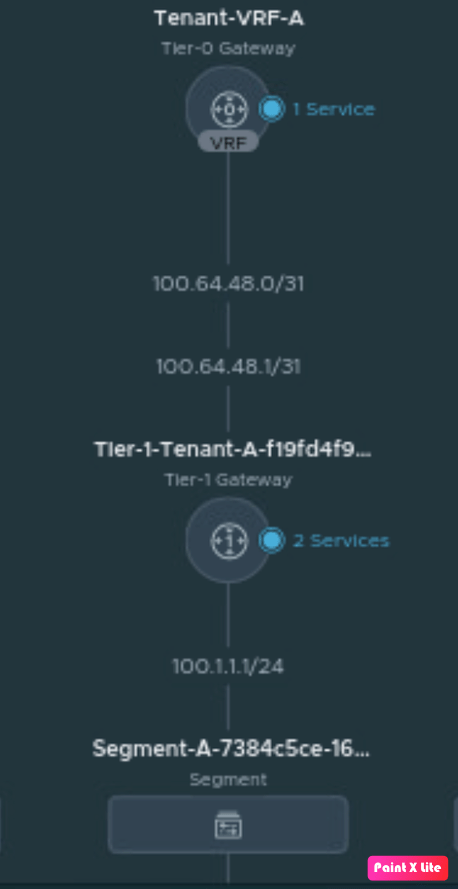
Verifying the network connecting in NSX-T, go to Networking and click on Network Topology.
Creating a Tier-1 gateway in Provider VDC-2 (Tenant-B)
In this section, we will create a new Tier-1 gateway and dedicate it to Tenant-b, which is in another provider (VDC-2)
| Name | Tier-1-Tenant-B |
| Tier-0 Gateway | Tenant_VRF_A |
| Edge Cluster | Create new or use existing Edge Cluster |
| Allocated IP subnet | Inherit it from the Tier-0 gateway |

In this section, we will create a new Tier-1 gateway and dedicate it to Tenant-B, which is in provider VDC-2.
Tier-0 gateway is already deployed. and the new Tier-1 gateway will be connected to the Tier-0 gateway specified in this section. Tier-1 and Tier0 gateways will be connected via inter-transit link 100.64.0.0/12.
Specify the edge cluster which can be a new edge cluster for each tenant or it can be the same used to deploy the parent/ child Tier-0 gateways.

Provide the IP subnet for the edge cluster for any stateful services like NAT. We used the same IP subnet when we onboarded child Tier-0 in Part-2. Make sure to advertise the subnet via set route advertisement rules in Tier-1 in case, this IP subnet is used for any stateful services. In the next step, review the configuration and click on finish to create a new Tier-1 gateway for VDC-2.

Verifying the creation of Tier-1 for Tenant-B in VDC-2 portal.
Creating a Network Segment in Provider VDC-2 (Tenant-B)
In this session, a new routed segment will be created and it will be attached to the Tier-1 gateway configured in the previous step.
In this blog, we are not considering the Datacenter group, which we will discuss in the next part.
| Scope | Current organization Virtual Data Center |
| Network Type | Routed |
| Edge Connection | Tier-1-Tenant-B |
| Gateway CIDR | 200.1.1.1/24 |
| IP Pool | 200.1.1.1-200.1.1.14 |
| DNS | NA |

Select Current Organization Virtual Data Center, as separate Segments will be created for both Tenants belonging to the same organization.
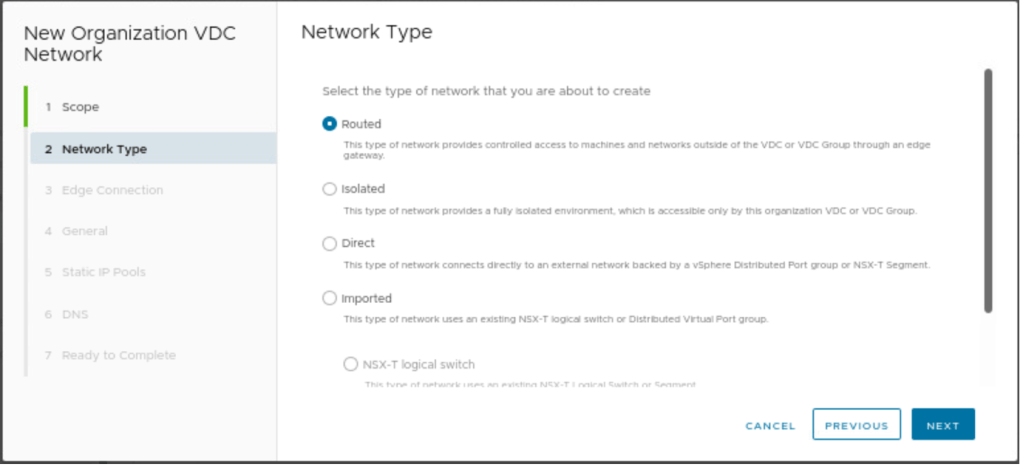
The routed segment will be selected, and this segment will be created for Tier-1 gateway.
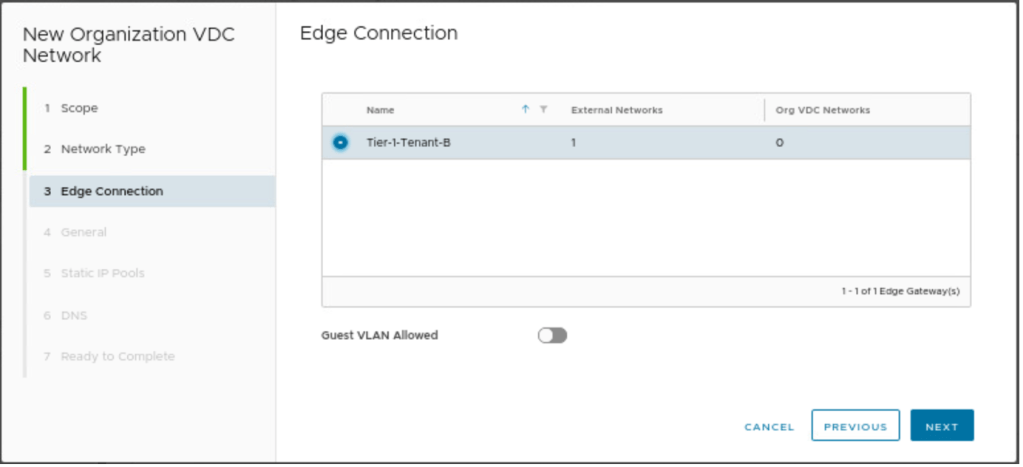
Select, the edge connection (Tier-1) gateway, on which the new routed segment will be connected.

A gateway CIDR has to be configured, for the newly created routed segment, along with that a new IP pool will be configured, which can be used to provide IP addresses to VM in a vAPP.

Providing the gateway IP address, which will be configured on Tier-1 gateway.
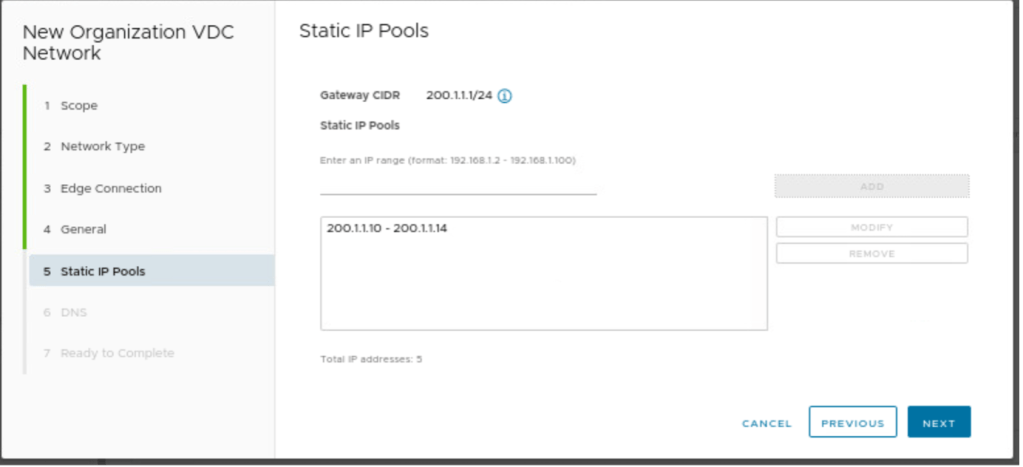
Configure the IP pool, which can provide IP addresses to VMs from this pool, if you select an IP address from the static IP pool.
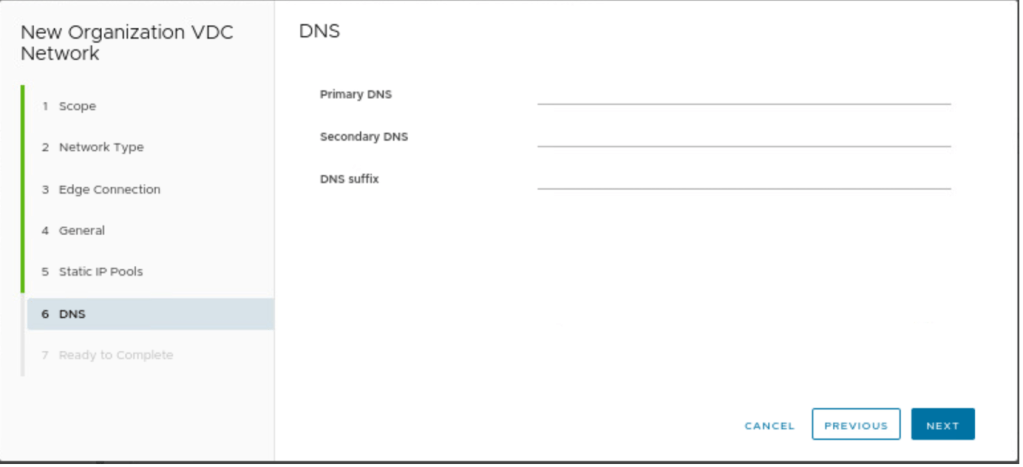
In our scenario, we don’t have any DNS details, therefore, no information has been provided.

Review the configuration and create a routed segment in VDC-2.

In the network session of OrgVDC Tenant-B, verify that a new routed segment along with Gateway CIDR and connected gateway is visible.
Creating a new VM in Tenant-B vAPP and connecting to Segment-B
In this part of the blog, a new VM-2 in the new vAPP will be created with the following details and will connect to Segment-B.
| vAPP Name | Tenant-B-vAPP |
| VM Name | VM-2 |
| Type | From Template |
| Templates | CentOS7 |
| Storage | Default |
| NIC | Manual-200.1.1.10 |

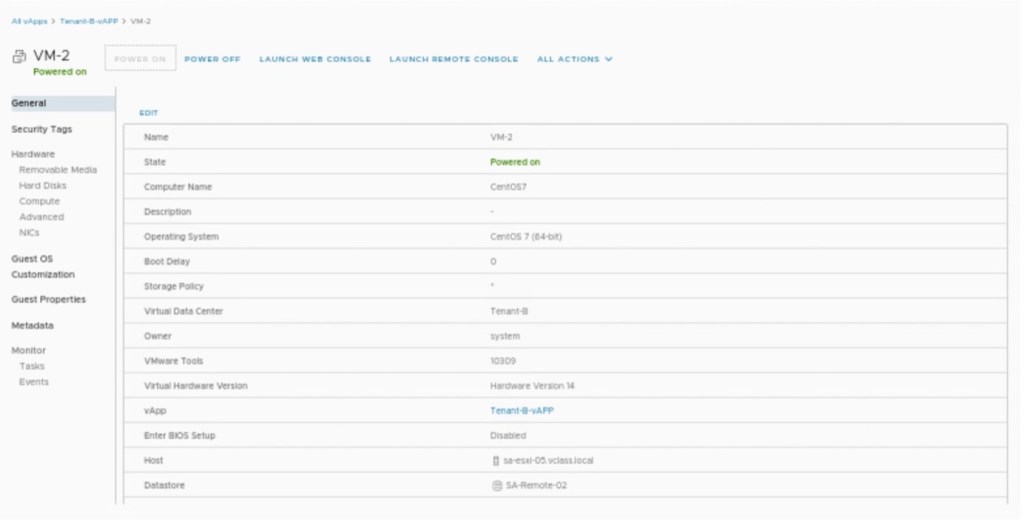
A new VM “VM-2” will be created with CentOS and IP address has been assigned manually to VM-2.

Review the network configuration of VM-2, which is Segment-B and the IP address has been assigned manually (200.1.1.10).
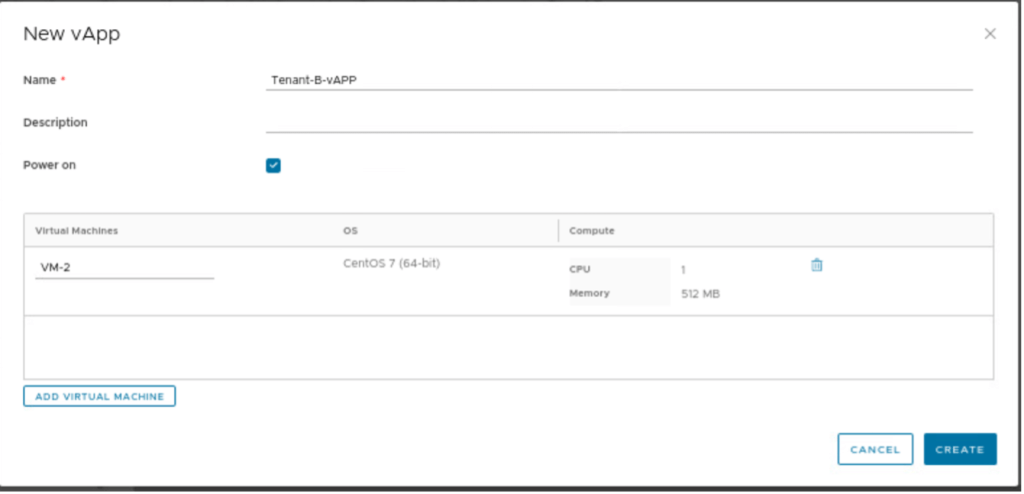
Give the name to a vAPP “Tenant-B-vAPP” and click on create.

Verify the name that a new VM-2 in Tenant-B-vAPP has been created and connected to segment Segment-B.
Go to Virtual Machines of vAPP “Tenant-A-vAPP” and power on the VM ”VM-1.
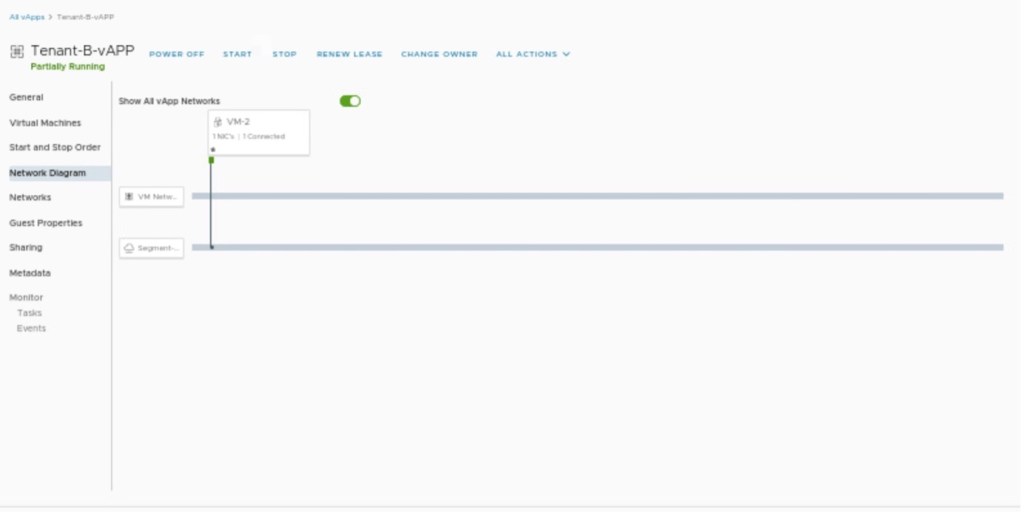
Verify the network diagram in”Tenant-B-vAPP” and it will also provide the information about VM-2 connected to Segment-B.
Verifying the network connecting in NSX-T, go to Networking and click on Network Topology.
Connectivity Test
In this session, we will check the connectivity between VM-1 (in Tenant-A) and VM-2 (in Tenant-B). Before checking the connectivity, make sure ping traffic is allowed on Tier-1 gateway firewalls, otherwise, VM-1 can’t reach VM-2.
In our scenario, we have allow all traffic on both Tier-1 gateway firewalls.

Changing the default action to “allow” on the Tier-1-Tenant-A firewall.

Changing the default action to “allow” on the Tier-1-Tenant-B firewall.

From VM-1, we try to connect the VM-1 gateway IP address, along with the VM-2 gateway and IP addresses.
In Summary:
In the first blog, (https://vxlearners.com/2023/06/07/nsx-t-integration-with-vcd-part-1/), we discussed on NSX-T configuration required to onboard a tenant in VMware cloud director. The second part, (https://vxlearners.com/2023/06/19/nsx-t-integration-with-vcd-part-2/), discussed the basic configuration required VMware cloud director required to configure OrgVDC and integrate it with NSX-T.
However, in this blog, we have created two tenants belonging to the same organization and created separate Tier-1 gateway per tenant. We have also created separate logical segments for both tenants and connected to the corresponding Tier-1 gateways. We have also tested the network connectivity between OrgVDC (Tenant-A and Tenant-B) belonging to the same organization.
In upcoming blogs, we will be configuring an inter-VDC using data center groups and creating a stretch Tier-1 gateway and will perform a failover of vAPPs from Provider-VDC-1 and Provider-VDC-2, retaining the same IP addresses.


Leave a reply to vCD integration with NSX ALB part 3 – vxlearners Cancel reply